Summary
The purpose of this article is to provide a consolidated page of technology information to facilitate a modified F2F or "HyFlex" learning as well as an overall remote work environment. Work is ongoing to hear and respond to needs as they are identified by instructors and learners.
If specific classroom related technology is required beyond what's in this article, please engage with our team by submitting a case through service.bethel.edu. We've linked forms specific to various needs below to better facilitate your requests.
We encourage faculty to experiment with the technology in advance and become familiar with it. If access is needed to a specific classroom, please contact the Facilities Management office to request that access in advance (651.638.6200).
Please note that most web-based applications will continue to work from off-campus but may require Bethel's Virtual Private Network (VPN) application to access certain resources (see below).
For faculty who require one-on-one assistance in redesigning their courses to be online (Moodle) or more "remote-friendly" please reference Moving Your Course Online Mid-Semester and/or email academic-development@bethel.edu.
The Fall 2020 COVID-19 and Teaching website provides critical updates and policies for faculty to reference.
Modified F2F or HyFlex Classes
The modified face to face, hybrid flexible, or HyFlex, course format is an instructional approach that combines face-to-face (F2F) and online learning. Class sessions and learning activity is offered in-person, synchronously online, and asynchronously online. The flexibility of the HyFlex model demonstrates a commitment to student success and flexibility during disruptions such as COVID19.
HyFlex might not be the best fit for lab classes, programs that require synchronous participation or certain disciplines. Further information is provided below for solutions to some of those needs.
Mike Caulfield, from WSU, put together a good high-level overview of the HyFlex environment.
Software Comparisons and Recommended Uses
The following are software recommendations for standardized interactions in the modified F2F learning environment. These are available to members of our community - if you need a piece of software that's listed here, please fill our our Employee Software Request form or our Classroom or Lab Software Request form (if its for a specific classrooms use).
Video-Teleconferencing Solutions
- Zoom - for synchronous collaboration with remote learners or remote instruction. Zoom use in the physical classroom should be limited to only on the computer that's part of the instructors station. A Zoom meeting can be displayed on the in class display(s) for F2F participants, with presentations and whiteboard demonstrations all conducted from within Zoom. We do not recommend F2F participants use Zoom simultaneously. The large increase in wifi utilization if all F2F participants were to use zoom or any video teleconferencing (VTC) options will likely result in decreased quality for everyone nearby. If all users have to join the VTC meeting we recommend the F2F participants turn off their cameras so only audio will be sent. We detail alternate solutions to collaboration software below that can facilitate these kinds of needed interactions.
Learning Management System and Integrations
- Moodle - this is our main learning management system. It should be used to submit and distribute classroom documents, link collaboration tools (such as Google docs and Poodll) and to administer quizzes, forum discussions and other classroom interactions broadly. More information can be found in the Moodle section of confluence.
- Moodle Chat (currently working on deploying) - a chat tool that is part of Moodle. Using this keeps more things within Moodle and can simply instructor/learner interactions as opposed to using an "outside" chat application.
- Poodll - allows for video messaging in Moodle forums. For security and FERPA compliance reasons, we recommend this over the use of FlipGrid. More information can be found in the Poodll section of confluence.
- Proctorio - online exam proctoring. Helps monitor testing in a closed textbook environment. Please use this request form if you need to use Proctorio.
- TurnItIn - plagiarism detection service. Third party system that checks for plagiarized or incorrectly cited material.
Google Applications
Further information can be found in the Google Application section of confluence.
- Google Drive - a web based file storage solution with unlimited storage available. Sharing of content is very simple, but users should note that its very easy to over-share, so be cautious of that. There are also no automation rules, so once access is given it can only be taken away manually.
- Google Docs - this allows for a real-time document based collaboration space that all learners can utilize. With the low bandwidth requirements, this is a great tool for facilitating simultaneous collaboration between F2F learners and virtual learners.
- YouTube - this allows for posting of lecture and other class-related videos. If posted as "Unlisted" they are easily linked within a Moodle course for distribution. This is also our recommended platform for LiveStreaming of campus events.
- Google Calendar - this can be used to facilitate one-on-one appointments with students. We've also integrated Zoom scheduling into our Google Calendar system for seamlessly scheduling remote meetings in a single location.
Summary
Google Calendar has the capability to create appointment slots. This functionality is great to indicate that you are available to meet with others at a specific time while reducing the risk of having multiple people try to meet with you at the same time. Google Hangouts Meet would allow an appointment to be remote.
Details
To create appointment slots on your Google Calendar:
- Create a new event on your calendar.
- Change the event type to appointment slots.
- Set the time parameters for when you will be available.
- Optionally set this to repeat for weekly office hours, etc.
- Share the appointment slot page by adding guests to select slots.
To incorporate Google Hangouts Meet into the appointment, a meeting will need to be created outside of Google Calendar. The link to that meeting can then be posted in the appointment slot details.
To sign up for an appointment slot, open the Google Calendar invite sent from the host. The calendar will open to the present day; navigation to a different day, week, or month may be necessary to sign up for an appointment slot. Claim an appointment slot. By default, claiming an appointment slot will notify the host.


- Google Chat - chatrooms can be created for classes or sub-groups of learner however may be needed to facilitate both synchronous as well as asynchronous chat-based communication.
Chat vs Meet
Google Hangouts Chat, or just Google Chat is a chat room tool that helps groups of people coordinate their communication. Google Chat is available at chat.google.com. Rooms can be created for specific purposes with specific people to facilitate communication. Google Hangouts Meet, or just Google Meet can be launched from these rooms to invite the individuals in the room. Google Chat is Google's instant messaging tool. You can message one person or multiple people with this tool as well as many other options as detailed by Google. The differences between Google Hangouts Chat and Google Hangouts Meet are further clarified by Google.
Google Chat can be opened by selecting the 9 dots in the top right corner of your Gmail and selecting the desired application.

- Jamboard - web based whiteboard software. This is just what it says - a virtual whiteboard application that you can share and collaborate boards all within Google.
- Google Forms - an online survey and polling tool. This could be used to replace the Turning Point "Clicker" system. We are also actively investigating Sli.do and Poll Everywhere as potential solutions. =
- Google Sites - this is a structured WiKi and web page creation tool.
Lecture Capture and Content Creation
- Ed-Puzzle - Quizzed video content. We are working on this currently - more to come.
- ScreencastOMatic - this is a very good screen recording software. The free version offers up to a 15 minute recording. - Screencastomatic
- Quicktime - default Macbook application that is great for screen recording.
- Microsoft Office (word, powerpoint, excel) - beginning in the Fall of 2020 this will be available to all active Students, Staff and Faculty for free (more information to come on this as we are still in the process of setting this up)
- Lucid-Chart - this is a web-based productivity application (flow charts). - Lucidchart
- Audacity - this is a digital audio editor and recording application. - Audacity
- Creative Cloud - Creative Cloud has several applications that can help with webpage creation, image editing, pdf editing, drawing, and many more.
- PDFEscape - free web-based pdf editor. - PDFescape
- VideoAnt - tool created by the University of Minnesota to do video annotation. - VideoAnt
- ArcGIS - a geolocational / graphic tool. This is a very sophisticated interactive mapping tool. A simpler, easier-to-use tool is Google Earth/Maps. - ArcGIS
- Qualtrics - this is a web-based survey tool we have. It can be used to create sophisticated surveys for distribution within Bethel. - Qualtrics
Classroom Facilitation and Software
- R - this is an open-source statistics software. SPSS and JASP (also open source) are other options as well.
- Q - this is a web-based research software.
- M - this is to see if you are paying attention.

- VLC Player - this software is on classroom computers and it enables the webcam to be used as a document camera.
- Zoom Whiteboard - whiteboard integrated into Zoom meetings.
- GoBoard - whiteboard integrated with Wolfram - more to come.
- Jamboard - collaboration tool by Google
- PollEverywhere - this is a web-based polling solution that can replace classroom clickers. - PollEverywhere
- Discord - collaboration tool that also provides voice chat.
Hardware in Classrooms and for Remote Learning
Each classroom, intended for lecture (so, not including lab or speciality use spaces) has been brought up to our technology standards. This standard has been focused on the ability for the instructor to connect with students virtually while incorporating F2F interaction. Standard elements of that hardware include:
- Webcam - we have deployed Logitech C920 webcams, which you may have consider or used as a document camera in the past. These are HD webcams with phenomenal microphones in them. We've tested and had no issues hearing both the instructor and students up to 30 feet away clearly (fully masked and/or using a face shield). They are on a flexible stand and can be moved around to change the view. They have autofocus that responds very quickly and can easily view and display whiteboards and writing on them. We recommend you write as large as you normally would and it will be clearly visible for both F2F and virtual learners. The classroom computers are configured to use these as the default webcam and microphone for Zoom sessions.
- Classroom computer - we've ensure there is a desktop with a "hard-wired" ethernet connection available in the classroom. We HIGHLY recommend you use this computer for your Zoom session as well as to display videos, presentations and other media. Using your Bethel laptop for example is not optimal as the WiFi connection will inevitably be less reliable and slower. We are testing touch-screens monitors in classrooms to better enable the use of virtual whiteboards as well.
- Speakers and Displays - we've configured classroom speakers to work with the classroom computer as well as the displays in the room (could be monitors or projectors depending on the space). If using Zoom on the classroom computer as recommended, remote participants will be clearly heard by all F2F learners over these speakers.
- Writing Tablets - we've procured a number of USB writing tablets that can be connected to your Bethel computer if teaching remotely. These tablets are best used for drawing/whiteboard use. They come with a pen to make writing as easy as possible in a virtual manner. If you need a writing tablet, please complete a Remote Work Loaner Equipment form. This form can also be used if you need an external microphone. We may need to do a Zoom session to confirm there isn't a misconfiguration before issuing an external mic.
In addition to the standard classrooms, we have adapted a number of non-classroom spaces for instructional use. Follow the links below to learn more:
- ANC 4th Floor - this was formerly planned to be an event space. We added an instructors station with a classroom computer and webcam.
- BC 209 (The Underground) - this is an event space. We added an instructors station with a classroom computer and webcam as well as additional WiFi access points.
- BC 411 (Olson Boardroom) - this was previously our most technologically advanced conference room on campus. We simplified it for classroom use.
- BC 468 - this was previously a large conference room. We added an instructors station with a classroom computer and webcam.
- CLC 159 (Benson Great Hall) - We added an instructors station with a classroom computer and webcam. A Benson Great Hall tech will be available to ensure the audio/video controls are working correctly and will transition the space between a classroom set up and event set ups (such as Chapel).
- LSC E100 (Lower/Upper Campus Center) - this was previously an open space. We added a projector and screen for presentation (upstairs in E200 as well).
- LSC B100 (Lower Library) - this was previously the 1st level of the Seminary Library in the Lakeside Center. We added a projector, screen, speakers and an instructors station with computer and webcam.
If you are in a space that needs additional equipment or is lacking equipment (we've checked, but things can always get missed), please submit a Classroom/Conference Room Support case with us so we can take immediate action.
Remote Computer and Software Access (for non web-based applications)
Virtual Private Network (VPN) Application - Cisco Any Connect
Cisco AnyConnect, our VPN application will allow you to connect to Bethel resources that require a connection to Bethel's network. A VPN will simulate being on-campus. If you currently are using Bethel's network (on any campus location), you do not need to use VPN.
Anyone who is using the VPN during a remote work situation, we ask that you use the Bethel University VPN-Split group (see connection details below). This will route only traffic that needs to be on the campus network there while allowing all other traffic (like Google use) to go through your normal internet service provider.
Summary
VPN, or Virtual Private Network, allows you to access data from off campus that is typically available only from on-campus, such as Argos or Banner. It also allow you to connect to your personal U drive and departmental drives. This article explains how to install and use VPN on a Windows 10 machine but should also be accurate on other versions of Windows.
Install VPN
- If you are ON campus, connect to Ethernet and navigate to https://vpn-setup.bethel.edu/ in a browser.
If you are OFF campus, navigate to https://vpn.bethel.edu/ in a browser.
The https:// is mandatory to access the installer.
- Log in using your Bethel Username and Password.

- Click Continue to agree to the Acceptable Use Policy.

- Select AnyConnect from the bar at the left hand side of the screen.

- Click Start AnyConnect.

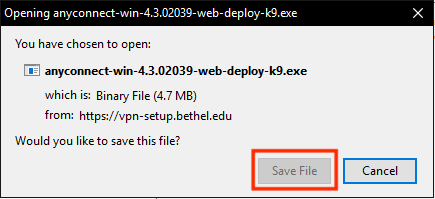
- The Cisco AnyConnect VPN Secure Mobility Client will go through a series of tests. Perform a manual installation by clicking on the AnyConnect VPN link.

- Another window will appear. Click Save File.
- Follow the installer prompts. Click Next.


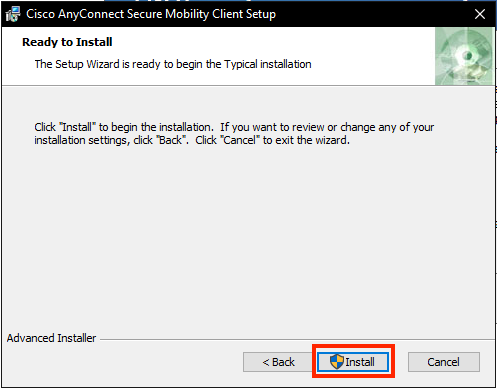

- You have successfully installed the Cisco AnyConnect VPN Client.
Please note that if you are installing VPN on Bethel campus, you will not successfully connect to VPN until your computer is off the Bethel network.
Using VPN
- Follow the instructions for Requesting a Group, and request the group "VPN Users".
- Click on the Start button and select or search for the Cisco AnyConnect Secure Mobility Client.

2. VPN will open. In the Connect To box, it should say vpn.bethel.edu. If not, type it in.
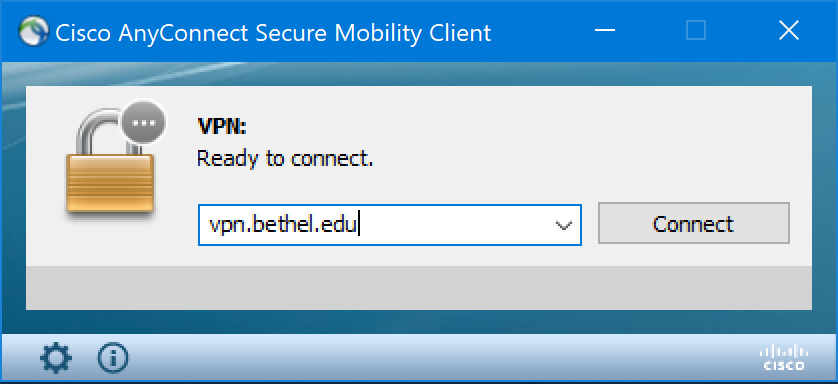
3. Select which VPN Tunnel you will be using and enter your Bethel username and password and click Connect.
VPN Tunnels
Please review this article for the appropriate tunnel to use based on your role and usage.

4. Click Accept on the Acceptable Use Policy window that appears.
5. The VPN window will then disappear, but you will still be connected.You can access VPN again either through the Start menu or the Taskbar in the lower right-hand corner of the screen.

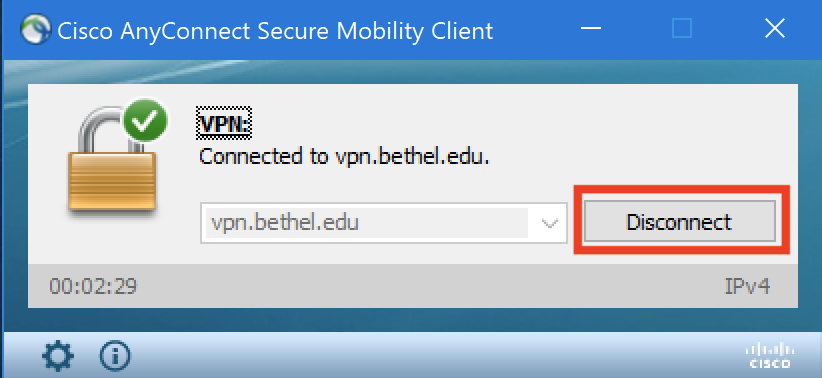
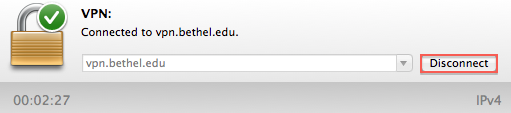
5. To confirm your connection, look for a green check mark and Connected to vpn.bethel.edu when you open the program.

6. To log out of VPN, open the program and click Disconnect. You can then close the window.
Summary
VPN (Virtual Private Network) is used when accessing information from off campus. For resources that require on-campus network connection – such as Argos and Banner – VPN will make your computer act as though it is on the Bethel network, protecting information you are accessing from the outside. This article gives instructions on installing and using VPN on macOS computers.
Installing VPN
- If you are ON campus, connect to Ethernet and navigate to https://vpn-setup.bethel.edu/ in a browser.
If you are OFF campus, navigate to https://vpn.bethel.edu/ in a browser.
The https:// is mandatory to access the installer.
- Login using your Bethel username and password.

- Click Continue to agree to the Acceptable Use Policy.
Select AnyConnect from the bar at the left hand side of the screen.

Click Start AnyConnect.

The Cisco AnyConnect Secure Mobility Client will then go through a series of tests. A Warning window will pop up. Check the box next to I accept the risk and want to run this application. Click Run.

- Another Warning window will appear. Click Don't Block.

- This will start the downloading process.

- As VPN downloads, multiple windows will appear and disappear. When the download process is complete, your computer will connect to VPN.

Please note that if you are installing VPN on Bethel campus, you will not successfully connect to VPN until your computer is off the Bethel network.
Using VPN
- Follow the instructions for Requesting a Group, and request the group "VPN Users".
- To open the program, open the Applications folder. Click on Cisco, then select Cisco AnyConnect Secure Mobility Client.
- VPN will open. In the Connect to box, it should say vpn.bethel.edu. If not, type it in. Then click Connect.

Then select which VPN Tunnel to use and enter your Bethel username and password and click OK.
VPN Tunnels
Please review this article for the appropriate tunnel to use based on your role and usage.

- Click Accept in the window that appears.
- The VPN window will soon disappear, but you will still be connected. You can open the program again either through the Dock or the icon located in the main menu bar.
 or
or 
- To confirm your connection, look for a green check mark and Connected to vpn.bethel.edu when you open the program.

- To log out of VPN, click the Disconnect button in the main VPN window.
Only faculty and staff members have access to Virtual Private Network resources at Bethel.
Remote Computer and Software Access
Some software applications aren't available for installation on personal computers, but are available on Bethel lab computers or laptop carts. If your course would normally use such software on a laptop cart or one of the computer labs your students can utilize Microsoft Remote Desktop to access a Windows server with the needed software installed, from an off-site computer.
Students and faculty will need to download and configure our Virtual Private Network (VPN) application - Cisco AnyConnect.
We have taken the preparatory measures and granted all current students, staff and faculty access to our VPN service, but devices will still need to be configured.
A VPN connection is required before students or faculty can remotely connect to the RDSH server.
Follow the steps below to configure the Remote Desktop application for your operating system.
In the computer name box enter bu-remote-desktop.bethel.edu to connect.
For Windows:
For MacOS:

Remote Desktop Protocol (RDP) Applications
Microsoft Remote Desktop allows you to access a Windows computer over the network or the Internet from a different device (either another Windows computer, or a Mac). Remote Desktop Protocol only allows one user to be logged in and using a given computer at a time, the same as if the user were physically present at the computer.
Remote Office Phone Use
Call Forwarding Always will need to be used by many staff and faculty that operate a desk phone. This can be set up on the physical phone or remotely.
Summary
If you want to forward incoming calls to another number, enable one or more of your Call Forwarding options on your Bethel Polycom phone. To turn on this feature on the web portal, click here.
From your Bethel Desk phone follow the instructions below according to the different options:
Call Forward Always
If you want to forward all incoming calls to another number, use Call Forward Always.
- To enable Call Forward Always, press the home button
, then press the button for Forward underneath the menu
- Select the button for Call Forward Always underneath the menu
- Enter the phone number to forward the calls to then select Enable
Call Forward No Answer
If you only want to forward calls that aren't picked up within a defined amount of rings, use Call Forward No Answer.
- To enable Call Forward No Answer, press the home button
- Select the button for Call Forward No Answer underneath the menu
- Enter the phone number to forward the calls to
- Enter the amount of Forward After Rings (default is 3) then select Enable
Call Forward Busy
If you only want to forward calls that come to you when you are already on your line, use Call Forward Busy.
- To enable Call Forward Busy, press the home button
- Select the button for Call Forward Busy underneath the menuS
- Enter the phone number to forward the calls to then select Enable
Summary
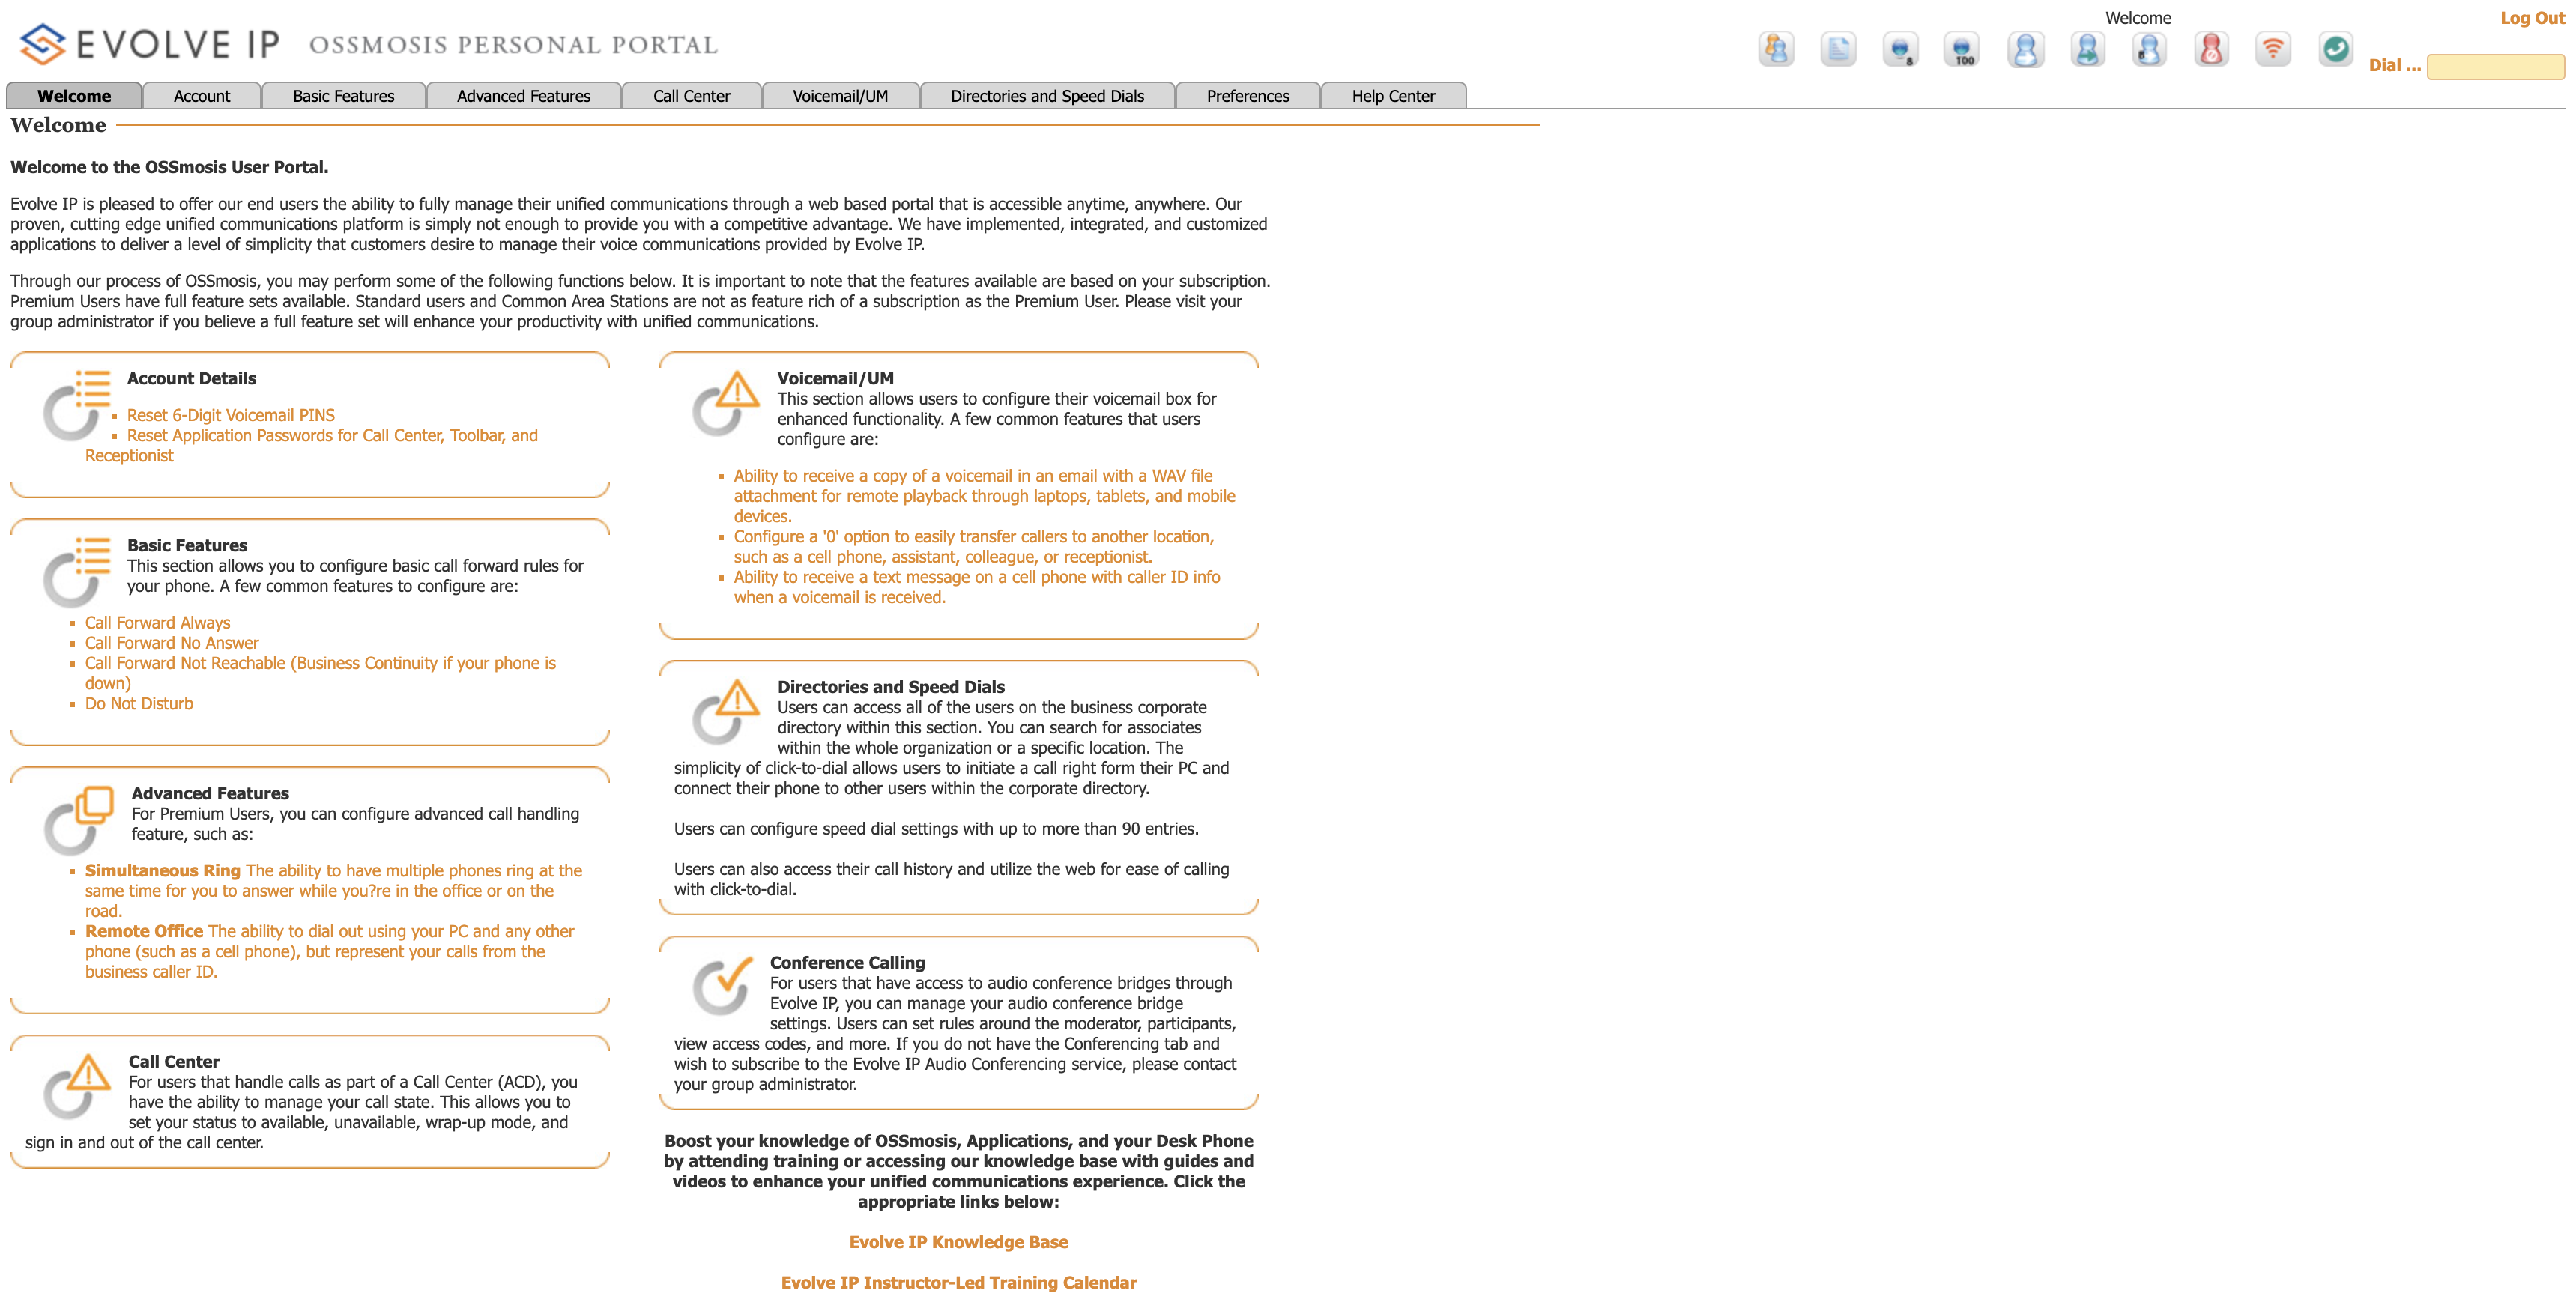
The Evolve IP OSSmosis Personal Portal is the web portal you can use to manage the behavior of your Bethel-provided Polycom desk phone. The web portal is available at https://evolveip.my-cloud-manager.com/PersonalPortal/login.jsp.

Logging In
- Username: Login to the web portal using the complete phone number of your desk phone including area code, prefix, and extension with no other punctuation (ex. 6516386500).
- Password:
- If this is your first time logging into the web portal or you forgot your password, please email the ITS Help Desk at helpdesk@bethel.edu to receive a temporary password.
- Note: This password is not the same as your Polycom desk phone's voicemail password. However, if you have a Webex account license, the login password into your Webex account also serves as this password.
- After logging in, to change from the provided password, reference the Changing Your Password: Evolve IP OSSmosis Personal Portal and Polycom Voicemail Confluence article.
- If this is your first time logging into the web portal or you forgot your password, please email the ITS Help Desk at helpdesk@bethel.edu to receive a temporary password.
Summary
This article explains how to forward calls on your Bethel-provided Polycom desk phone using the Evolve IP OSSmosis Personal Portal. These steps apply to a personal desk phone number. If you need forwarding set up for a group number that is not tied to just one desk phone, such as a call center, please contact the ITS Help Desk at helpdesk@bethel.edu to inquire about this possibility.
- To access the web portal, login to https://evolveip.my-cloud-manager.com/PersonalPortal/login.jsp. Once you login, you will see the dashboard (pictured below). If you aren't sure how to login, please reference the Evolve IP OSSmosis Personal Portal Confluence article.
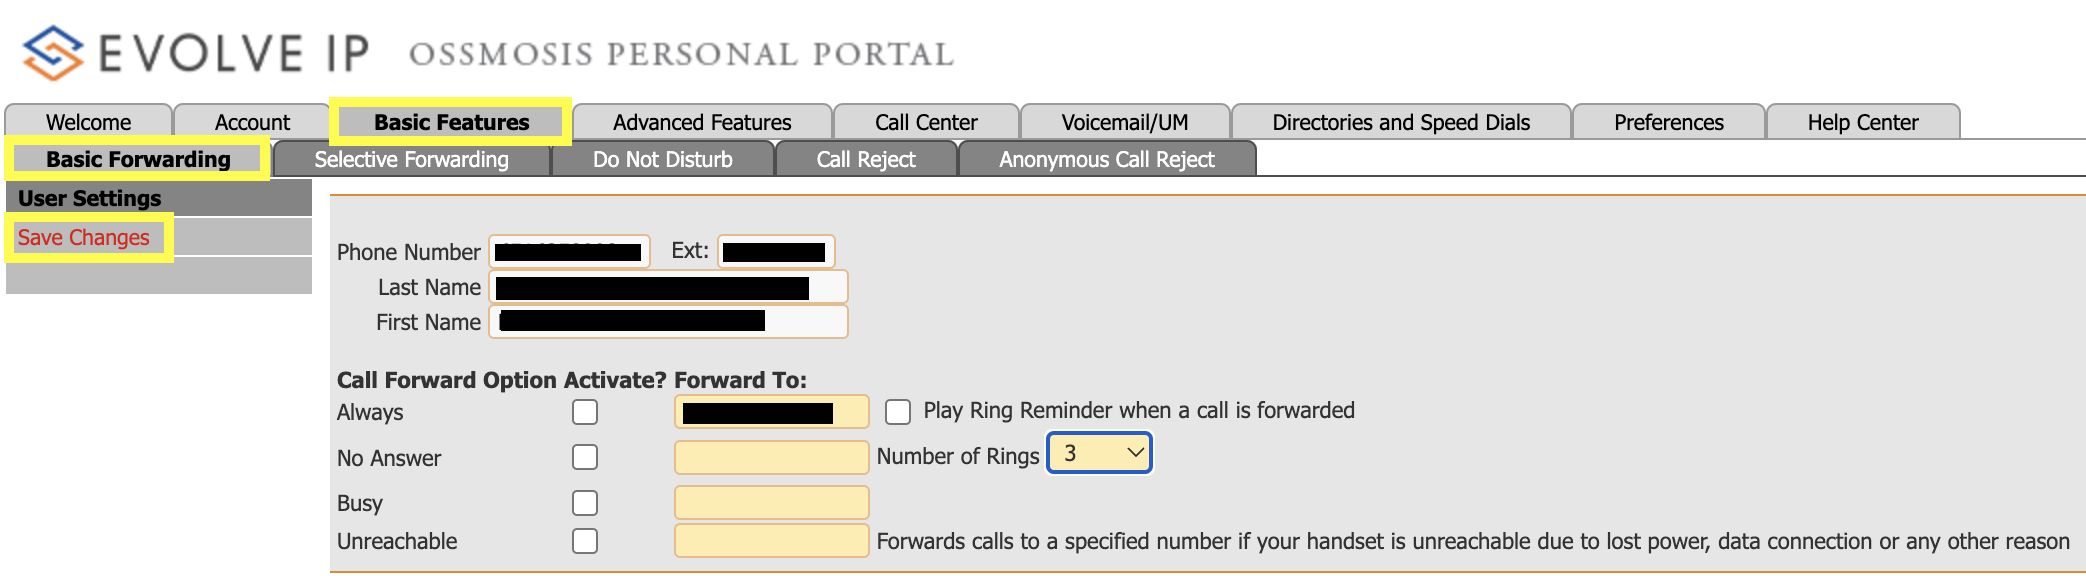
- To access the Forwarding options, click the Basic Features tab on the top row. In the underlying tab, the forwarding options will appear under the default tab for Basic Forwarding (pictured below).
- For any of the 4 feature options you wish to activate, which are described in detail below, make sure to check the box to make sure the feature is active. Then put in a 10-digit phone number that you would like your calls to be forwarded to, including area code, prefix, and extension with no other punctuation (ex. 6516386500). Click Save Changes on the left column when you are done (pictured below).
Call Forward Always
Call Forward Always forwards every call sent to your desk phone. This option comes with an optional Ring Reminder feature, which beeps the desk phone as a call is forwarded so you don't accidentally leave it on.
To activate this feature:
Select the checkbox to the right of Always.
Input the 10-digit number you would like these calls to forward to.
Optionally, select the checkbox for Play Ring Reminder when a call is forwarded.
Click Save Changes on the left column.
Call Forward No Answer
Call Forward No Answer directs calls to a different number when you do not answer. You can enter the number of times the phone rings before forwarding (options are None and numbers 2-20). This option is helpful if you're going to be away from your desk for an extended period of time and don't want to have to worry about turning on Call Forward Always.
To activate this feature:
- Select the checkbox to the right of No Answer.
- Input the 10-digit number you would like these calls to forward to.
- Optionally, edit the Number of Rings in the drop-down menu.
- Click Save Changes on the left column.
Call Forward Busy
Call Forward Busy routes calls to a different number when your line is busy. This option is helpful when you're going to be in a conference call or a long conversation and are worried about missing important calls. Using the web portal, you can turn on this feature while your phone is in use.
To activate this feature:
- Select the checkbox to the right of Busy.
- Input the 10-digit number you would like these calls to forward to.
- Click Save Changes on the left column.
Call Forward Unreachable
Call Forward Unreachable sets a backup number to route calls to if your physical device is out of order. This option is only available through the web portal, and it is helpful if you are going through an office renovation or your phone is having connection issues. This option is most effective if you set a backup number and leave Call Forward Unreachable on so you do not miss any important calls in case of a phone issue.
To activate this feature:
- Select the checkbox to the right of Unreachable.
- Input the 10-digit number you would like these calls to forward to.
- Click Save Changes on the left column.
If Call Forwarding is not going to be used, a few other options exist. You can have your Bethel voicemail forwarded to your email. You can also call your Bethel voicemail from your cell phone. To access your Bethel voicemail from your cell phone, dial your 10 digit phone number, during the voicemail greeting press *, enter your voicemail passcode after the prompt.
Secure File Storage and Transmission
Network Attached Storage (NAS - or commonly referred to as Department Folders)
Bethel St. Paul Network Attached Storage, or BSP-NAS, is Bethel's network storage solution that many departments and individuals host data. Connecting to the NAS does require connection to Bethel's network, so off-campus work will require the use of Bethel's VPN. On Bethel provided Windows computers, network drives should appear in File Explorer. If the NAS does not appear, follow this section for access.
In compliance with regulations from the Department of Health and Human Services, we have taken the necessary step to ensure that our Google environment is also a Health Insurance Portability and Accountability Act of 1996 (HIPAA) complaint storage solution. In addition to file storage, health care providers (such as Counseling Services or degree programs with clinical interaction requirements) that seek additional privacy protections for telehealth while using video communication products can provide such services through Google as we have entered into a HIPAA business associate agreements (BAAs) in connection with the provision of their video communication products. This means Google Meet is an approved video communication product to use for health care providers.
Secure File Sharing Outside of Google
To securely share files with confidential data to a recipient outside of our Bethel Google environment (@bethel.edu), use our secure file transfer tool available at secure-files.bethel.edu.
Argos
Argos is used by many staff, faculty, and student workers on campus. Using Argos off-campus is very similar but not identical to being on campus. Using the Argos Web Viewer (accessed via https://argos.bethel.edu) is an identical process. If you use the Argos Desktop App pinned to your taskbar, you will need to sign in to Bethel's VPN before being able to reach the authentication server to log in to the Desktop App.