Versions Compared

Key

  • This line was added.
  • This line was removed.
  • Formatting was changed.
Excerpt

Summary

VPN, or Virtual Private Network, allows you to access data from off campus that is typically available only from on-campus, such as Argos or Banner. It also allow you to connect to your personal U drive and departmental drives. This article explains how to install and use VPN on a Windows 10 machine but should also be accurate on other versions of Windows.

Install VPN

Expand
titleDetails
  1. If you are ON campus, connect to Ethernet and navigate to https://vpn-setup.bethel.edu/ in a browser.

  2. If you are OFF campus, navigate to https://vpn.bethel.edu/ in a browser.

    Note

    The https:// is mandatory to access the installer.

  3. Log in using your Bethel Username and Password.


  4. Click Continue to agree to the Acceptable Use Policy.


  5. Select AnyConnect from the bar at the left hand side of the screen.


  6. Click Start AnyConnect.


  7. The Cisco AnyConnect VPN Secure Mobility Client will go through a series of tests. Perform a manual installation by clicking on the AnyConnect VPN link.


  8. Another window will appear. Click Save File


  9. Follow the installer prompts. Click Next.


  10. You have successfully installed the Cisco AnyConnect VPN Client.


Please note that if you are installing VPN on Bethel campus, you will not successfully connect to VPN until your computer is off the Bethel network.


Using VPN


Expand
titleDetails


  1. Follow the instructions for Requesting a Group, and request the group "VPN Users".

  2. Click on the Start button and select or search for the Cisco AnyConnect Secure Mobility Client.


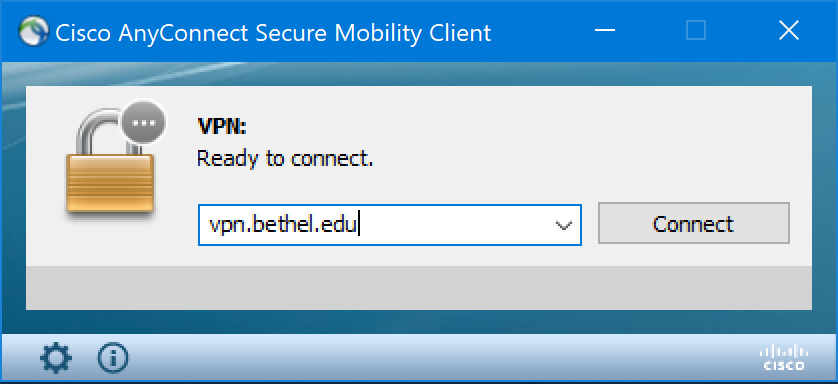
2.  VPN will open. In the Connect To box, it should say vpn.bethel.edu. If not, type it in.


3. Select which VPN Tunnel you will be using and enter your Bethel username and password and click Connect.

Note
titleVPN Tunnels

Bethel University VPN: This sends all traffic from your computer through the VPN. It is recommended to use this on public wifi networks

Bethel University VPN-split: This only sends traffic that needs to come to Bethel through the VPN. All normal internet traffic will simply go through your internet provider. It is recommended to use this on home wifi networksPlease review this article for the appropriate tunnel to use based on your role and usage.


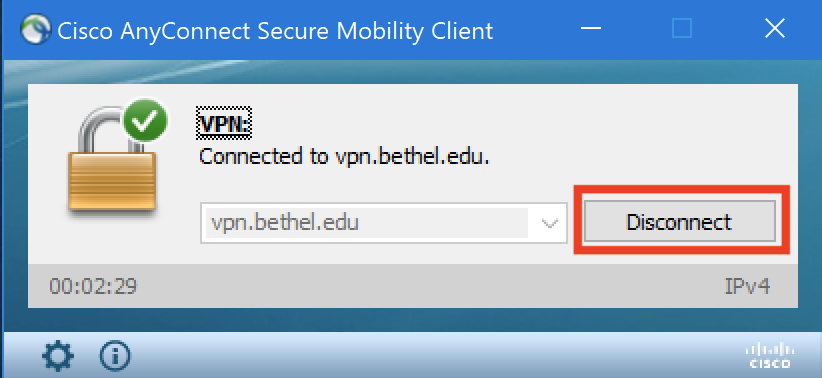
4. Click Accept on the Acceptable Use Policy window that appears.

5. The VPN window will then disappear, but you will still be connected.You can access VPN again either through the Start menu or the Taskbar in the lower right-hand corner of the screen.


5. To confirm your connection, look for a green check mark and Connected to vpn.bethel.edu when you open the program.


6. To log out of VPN, open the program and click Disconnect. You can then close the window.