Summary: Shows how to use Got Your Back (GYB) to migrate email from a Google account (GApps or Gmail) to another Google account.
Note: The user needs to be present for this process to be done. They will need to authenticate both the source and destination account.
This tutorial was tested with version 0.45 (https://github.com/jay0lee/got-your-back/releases/download/v0.45/gyb-0.45a-windows.zip)
For this tutorial we will use the following sample info:
Source account: source@bethel.edu
Destination account: destination@bethel.edu
Backup Label (optional): tobackup
Restore label (highly recommended): Restore-Date (example: Restored-April5-2016)
Installing GYB
- Download GYB at https://github.com/jay0lee/got-your-back/releases
- Extract the archive to a folder of you choice. The email will be downloaded to this folder for the migration process.
- Open the folder. (You will find gyb.exe here. You will run GYB directly from this folder.)
- You can get a list of options that GYB can do by:
- Opening a command prompt in the folder (Shift+Right Click an empty area in the folder and click Open command window here)
Run the command:
gyb.exe --help
Backing up a mailbox
- [Optional] Have the user label everything they want downloaded from the source account with gmail labels.
This can be done in advance. If no labeling is done you can only download the whole mailbox. - Open a command prompt in the folder with GYB (see Installing GYB)
- Get access to the destination account first by running the following commands: (we will need this later to restore the backup)
Destination account first:
gyb.exe --email destination@bethel.edu --action estimateYou will find that a file appears in the folder with gyb.exe that is called destination@bethel.edu.cfg
- GYB will ask what actions you want to perform on the account. Type 2 for Gmail Restore Only and hit Enter. The selection will look as follows
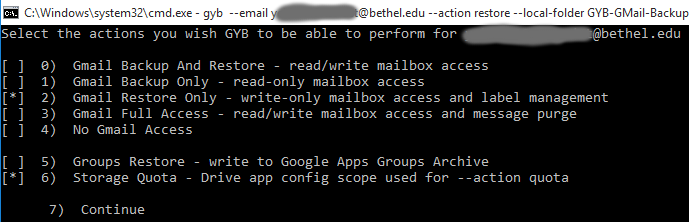
- Type 7 for Continue and hit Enter
- A web browser will open and ask the user for credentials to authenticate. (GYB will request access to the account and specify the permissions it needs. The user must accept to continue.)
- The browser will say authentication complete and the command prompt will say "403: Insufficient Permission - insufficientPermissions" this is normal as we did not want the destination account to be read.
- You will notice that a new file has appeared called destination@bethel.edu.cfg this will need to be deleted when the whole process is complete.
- Backup the source account
- You can do a selective backup if the user labeled their emails or backup everything. Pick one.
Command to backup a labeled mailbox: (the text after --search can be tested in gmail by searching with the exact text, no quotes)
Labeled backupgyb.exe --email source@bethel.edu --action backup --search"label:tobackup"Command to backup everything in the mailbox:
Backing up the whole mailboxgyb.exe --email source@bethel.edu --action backup
GYB will ask what actions you want to perform on the account. Type 1 for Gmail Backup Only and hit Enter. The selection will look as follows

- Type 7 for Continue and hit Enter
- A web browser will open and ask the user for credentials to authenticate. (GYB will request access to the account and specify the permissions it needs. The user must accept to continue.)
- The backup may take some time to run. Once complete you will notice that the folder containing gyb.exe now has an additional folder named GYB-GMail-Backup-source@bethel.edu. This folder contains the backed up emails
- There is also a file named source@bethel.edu.cfg this will need to be deleted once the process is complete.
- You can do a selective backup if the user labeled their emails or backup everything. Pick one.
Restoring a mailbox:
- You will need the backup files from the backup step above.
- Open a command prompt in the folder with GYB (see Installing GYB)
Restore the mailbox to the destination:
gyb.exe --email destination@bethel.edu --action restore --local-folder GYB-GMail-Backup-source@bethel.edu --label-restored Restored-April5-2016This may take a while. Also note that you must be in the folder that contains both gyb.exe and the GYB-GMail-Backup-source@bethel.edu folder or you will need to adjust the command.
- Authentication was already done before the backup so GYB should be able to restore all the data. If it fail for some reason you can run the command again and it should not duplicate any of the emails.
Clean up:
- Once the process of restoring is complete and you no longer need access the the users account delete the downloaded mail folder and the cfg files that were mentioned
- Delete folder GYB-GMail-Backup-source@bethel.edu
- Delete files: source@bethel.edu.cfg and destination@bethel.edu.cfg
- Important: Make sure to tell the user to revoke access for GYB on their google account.
- Visit security.google.com
- Near the top of the page you will find Security Checkup click Get Started.
- If you have multiple bethel accounts linked to you name select the appropriate account
- Click Looks good twice to get to Check your account permissions
- Click remove on Got Your Back: Gmail Backup (you may need to expand the list to see it)
- Click done then Continue to account settings
Troubleshooting:
- The software is well designed if any step fails you can just run it again. Multiple restore attempts should not generate duplicated emails. However every time you restore you should label the restore to have a backup plan so you can delete all the duplicates should something go really wrong.